
Where do I see my current stock in Tazk POS?
Open Inventory → Stocks. It lists every product with stock at the location chosen in the header, with its available quantity, cost price and total value, and shows Total, Qty and Count figures at the top. Switch the view with the chips (All, Lot, Model, Category, Brand, Vendor, Uploaded Stock, DC Stock), click a product to see its movement history, and use More actions to export the list or upload opening stock.
What does the Stocks page show?
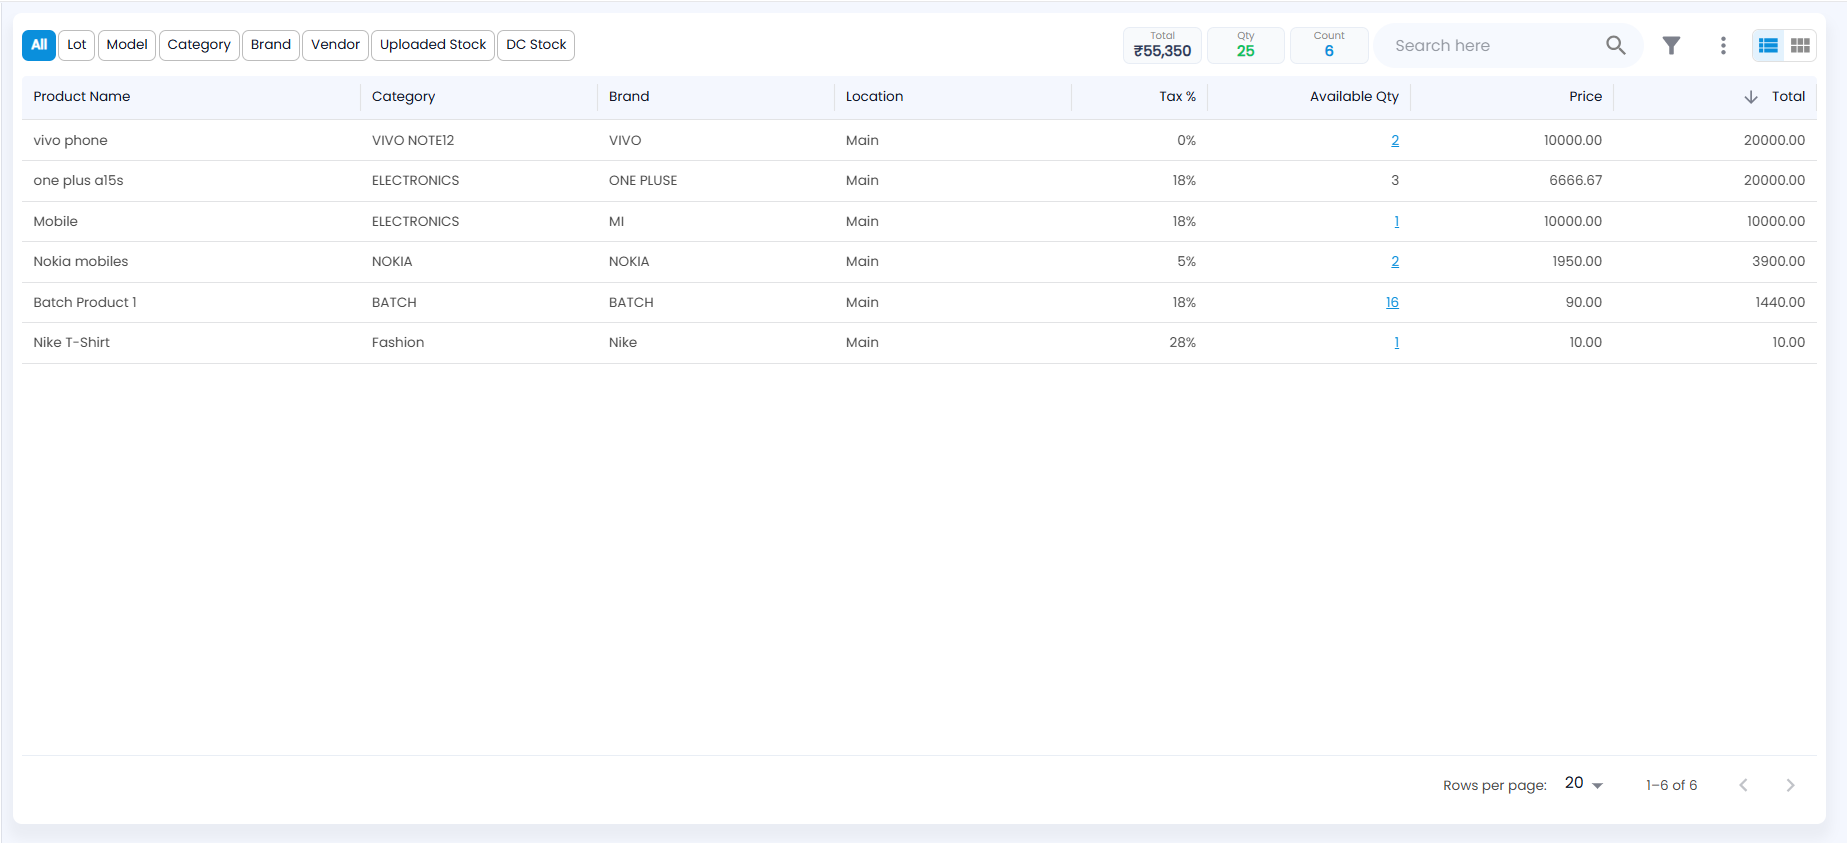
Click Inventory → Stocks. The figures are for the location selected in the header; choose a location there to see one store or warehouse. Next to the chips are three figures for the current view, then Search here, the filter icon, the ⋮ menu (More actions) and the list / grid icons:
| Figure | What it shows |
|---|---|
| Total | Value of the stock, at cost (available quantity × cost price, before GST) |
| Qty | Total available quantity |
| Count | Number of rows in the view |
On the Uploaded Stock and DC Stock chips the figures are labelled Opening and DC instead, and cover only that stock.
What do the chips at the top do?
| Chip | What the list shows |
|---|---|
| All | One row per product: Product Name, Category, Brand, Location, Tax %, Available Qty, Price and Total, sorted by Total (highest first). Depending on your settings, more columns such as SKU, HSN Code and Product Type can be shown |
| Lot | One row per lot, adding Location, Lot Number and Age (how long the stock has been held) |
| Model / Category / Brand | Stock totalled by model, category or brand, with Available Qty and Total |
| Vendor | Stock totalled by Supplier Name |
| Uploaded Stock | Opening stock brought in by upload: Location, Lot #, Source, quantity, price, total and age |
| DC Stock | Stock out on delivery challans, with DC # and DC Date. Click a DC number to open the challan |
Price is the cost price before tax, and Total is the available quantity at that cost. Tax % is shown for information only. Product Type tells you whether the product is serialized (each unit has its own serial or IMEI number), non-serialized, or batch-tracked.
On the Stocks page you can switch between the list and a grid of cards with the icons next to the search box.
How do I search and filter stock?
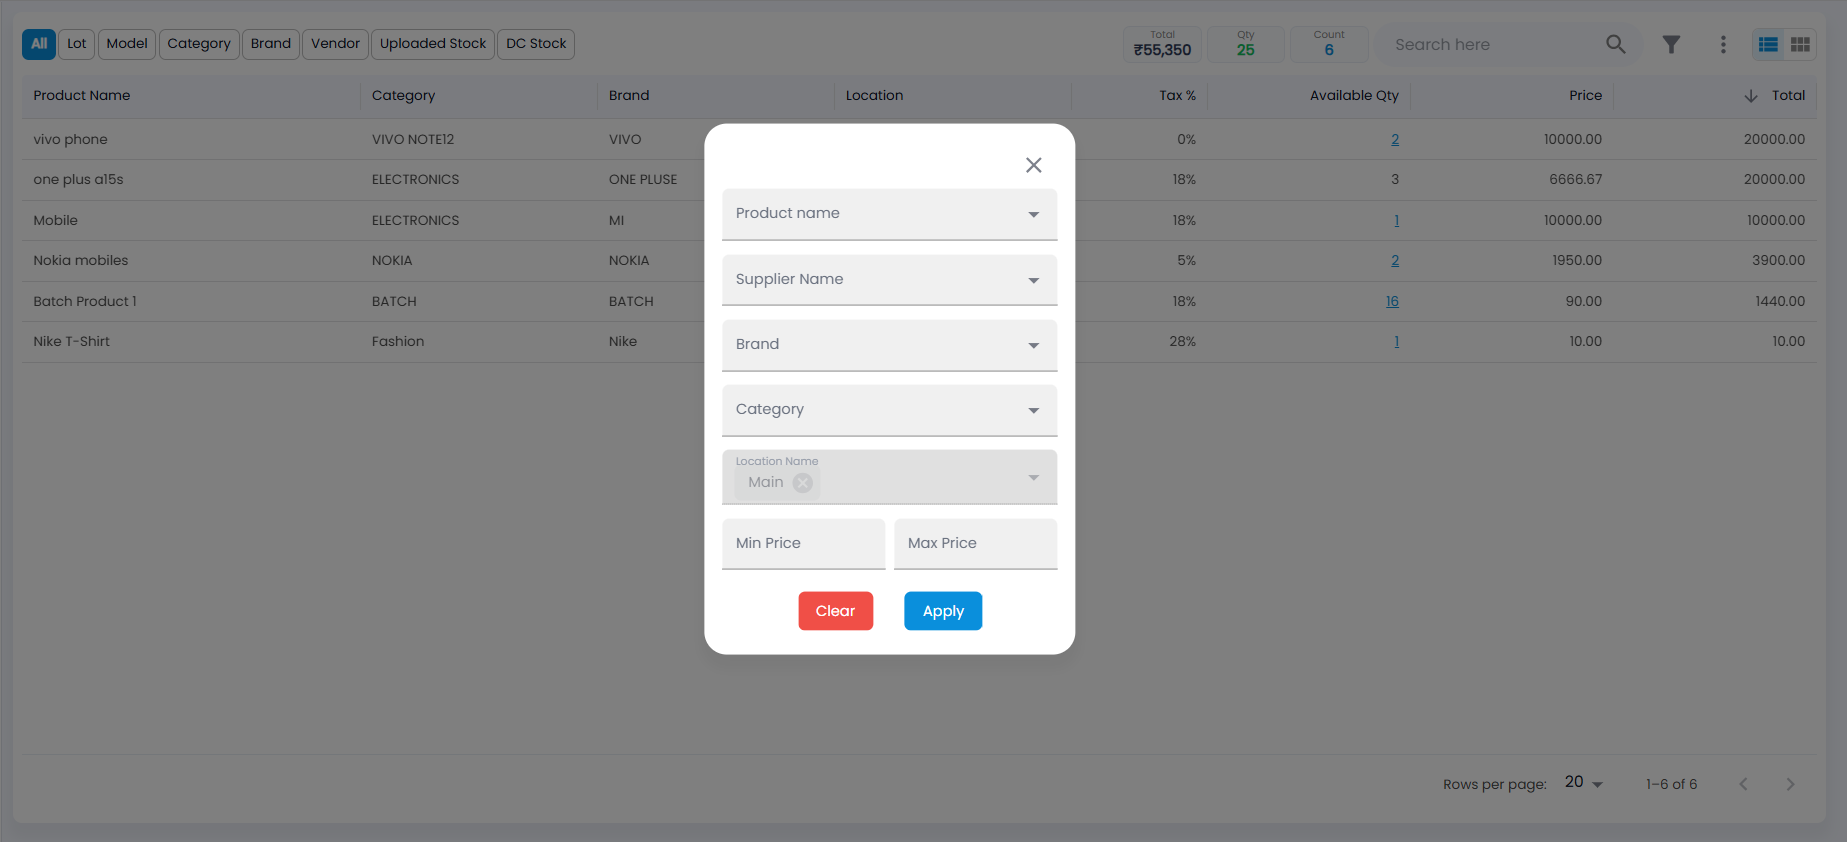
Type in Search here to find products by name. Click the filter icon to narrow the list by Product name, Supplier Name, Brand, Category, Location Name (your location is already chosen) and a Min Price / Max Price range, then Apply (or Clear). The filter icon shows how many filters are on.
How do I see the serial numbers or lots behind a quantity?
For serialized and batch products on the Stocks page, the Available Qty is a link. Click it to see the lots (serial / IMEI numbers, or batches with their manufacture and expiry dates) that make up the quantity. From that list you can edit a lot number; you are asked for a Reason / Remark and to Confirm Lot Number Change, and the change is kept in the product’s history.
What happens when I click a product?
On the All and Lot views, clicking a row opens a detail panel for that product:
- Cards — Available Qty, Stock Value, Total Purchased, Sold (All Time), Sold (This Month) and Cost / Price. A badge shows In Stock, Low Stock (at or below the reorder level) or Out of Stock.
- A stock in / out chart of recent movements.
- Movement history — Date, Type (Purchase, Sale, Sale (POS), Sales Return, Purchase Return, DC, DC Return, Opening Stock, Stock Uploaded and so on), Document, Party and Qty.
- Stock by Location — how much is held at each location, and in how many lots or batches.
- Batch Details for batch products, where Edit Batch Details lets you correct the Batch Number, Manufacture Batch Number, Manufacture Date and Expiry Date.
- Quick Actions — Add Stock (opens the stock upload), Transfer Stock (goes to Stock Transfer) and Create Sale (goes to Invoices).
For a lot-by-lot audit trail of a single serial number, use Lot Traceability.
How do I upload opening stock?
Use this when you start on Tazk POS or bring in stock you already hold. Stock is uploaded into the location selected in the header, so pick one first.
- Click the More actions menu (three dots) and choose Upload. The full-screen Stock Upload page opens.
- Click Download template and fill it in: product, quantity, serial / lot number, cost per unit and MRP.
- Choose the filled-in file. Every row is checked against the product master and the last purchase cost before anything is written, and shown as OK, Check or Error.
- Correct rows that need it. For cost and MRP you can keep the sheet’s values, use one value for all, or take the item master cost, item master MRP or last purchase cost.
- Click Upload. When it finishes, the upload appears on the History tab.
The History tab lists every upload with its rows, so you can open an upload and edit or delete rows that have not been used yet.
How do I export stock or return it to a vendor?
From More actions, choose Export PDF or Export CSV to download the current view (needs the export right). To send stock back to a supplier, tick the products in the list; the search and filter are replaced by a Purchase Return button that opens a purchase return for the selected items.