
How do I bill a customer at the counter in Tazk POS?
Go to Point Of Sale → Sales Counter, click New Session (or Resume) on your counter, then scan a barcode or pick products into the cart. Click Payment, pick the customer, apply any coupon, enter the amount against a payment mode and click Validate. The sale is saved as an invoice and you can print the receipt or the tax invoice. At the end of the shift, click Close on the counter card and validate the summary.
What does the Sales Counters page show?
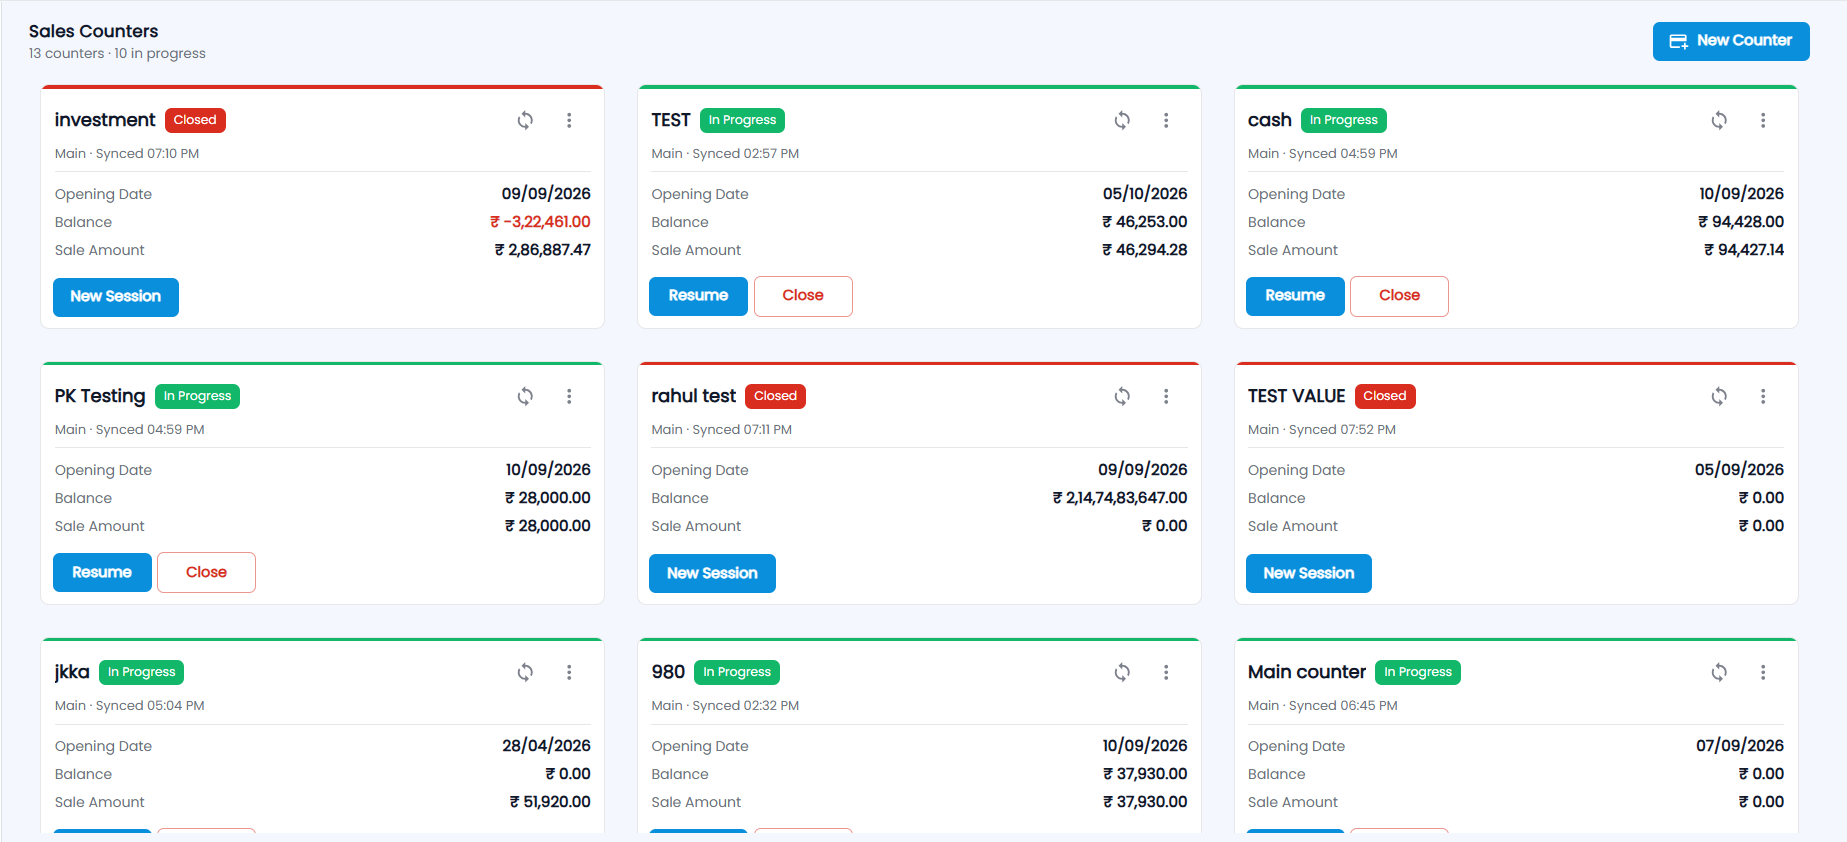
Open Point Of Sale → Sales Counter. The Sales Counters header shows how many counters you have and how many are in progress — for example 13 counters · 10 in progress. Each counter is a card, with a green top edge while a session is in progress and a red one when it is closed:
| On the card | What it means |
|---|---|
| Name and status chip | New (never opened), In Progress (a session is open) or Closed |
| Location line | The counter's location and when it last synced |
| Opening Date | When the current or last session was opened |
| Balance | The counter's current cash balance (shown in red if negative) |
| Sale Amount | Sales made in the session |
| Sync icon | Pushes sales saved offline to the server. A red dot means there are unsynced sales. |
| ⋮ menu | View Summary, View Report, Edit and Delete (Edit and Delete only if your role allows them) |
The button at the bottom of the card depends on its state: New Session on a closed or new counter, Resume and Close on a session you opened, or In use by … when another user holds the session.
How do I set up a new counter?
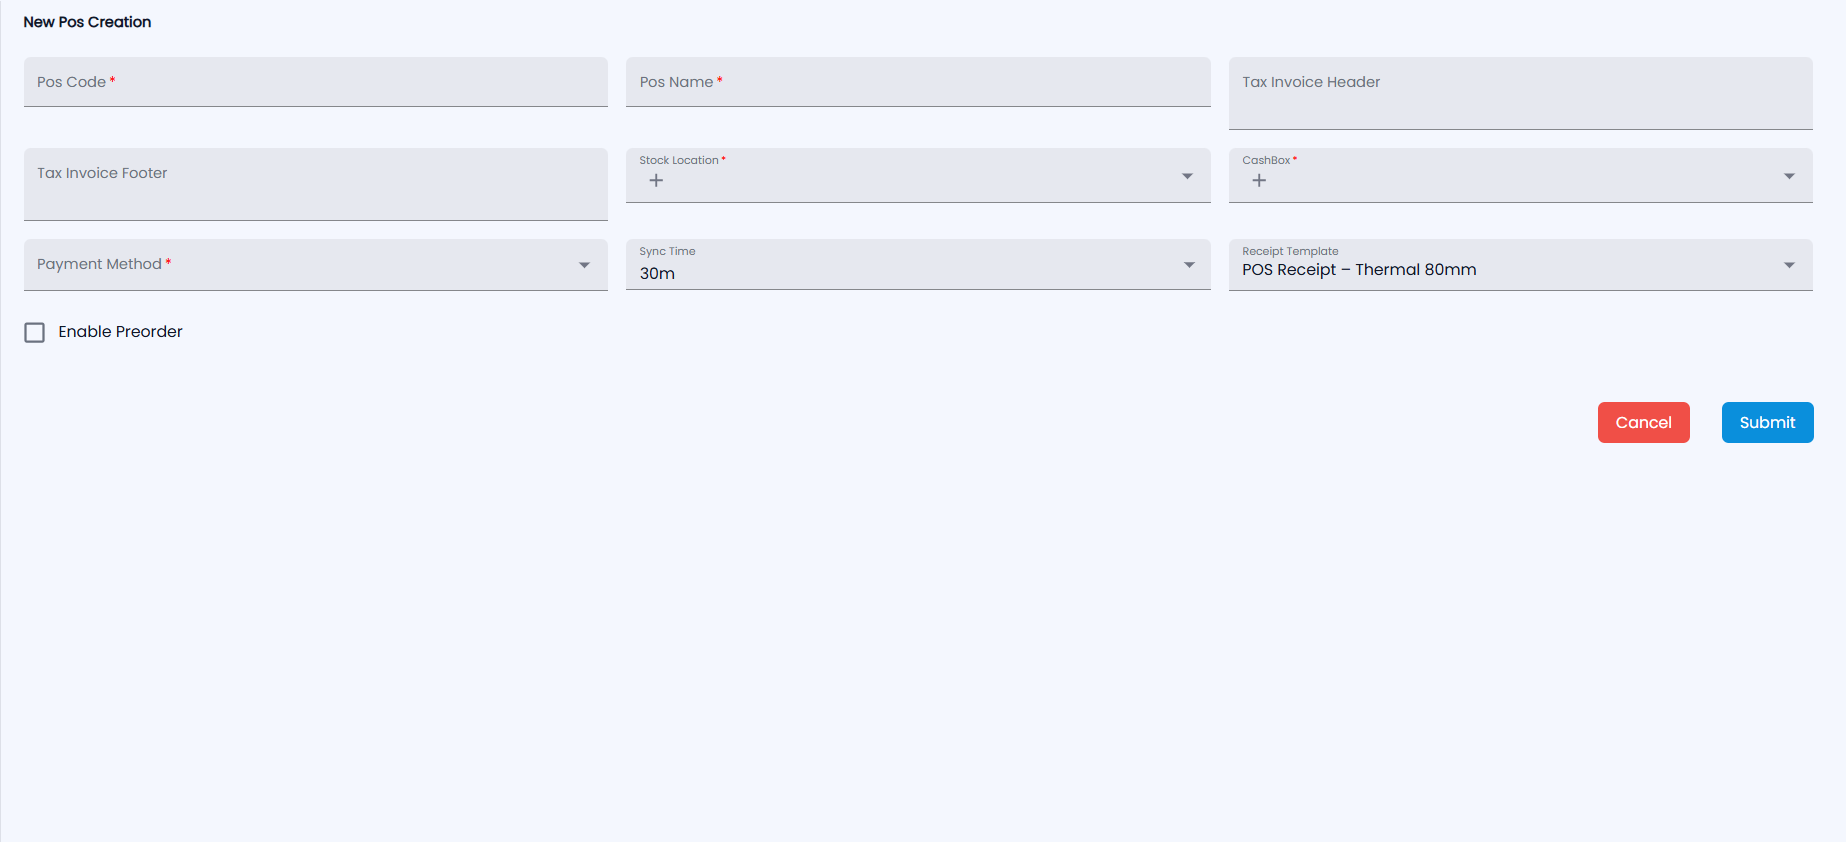
- Click New Counter (shown if your role can create counters).
- Enter the Pos Code and Pos Name.
- Enter the Tax Invoice Header and Tax Invoice Footer text printed on bills.
- Choose the Stock Location the counter sells from and its CashBox. Click + in either field to create a new one without leaving the form.
- Choose the Payment Methods the counter accepts — these become the payment-mode buttons at the till.
- Choose a Sync Time — how often the counter sends offline sales to the server: 30m (default), 1h, 1h30m or 2h — and a Receipt Template (default POS Receipt – Thermal 80mm; templates come from Document Templates). Tick Enable Preorder if the counter takes bookings.
- Click Submit. Pos Code, Pos Name, Stock Location, CashBox and Payment Method are required.
How do I open or resume a session?
Click New Session on the counter card. The billing screen opens for that counter. If you already have a session open on the counter, click Resume. You can only work in one session at a time — Resume says Can't resume — close your current session first if you have another one open.
How do I add products to the bill?
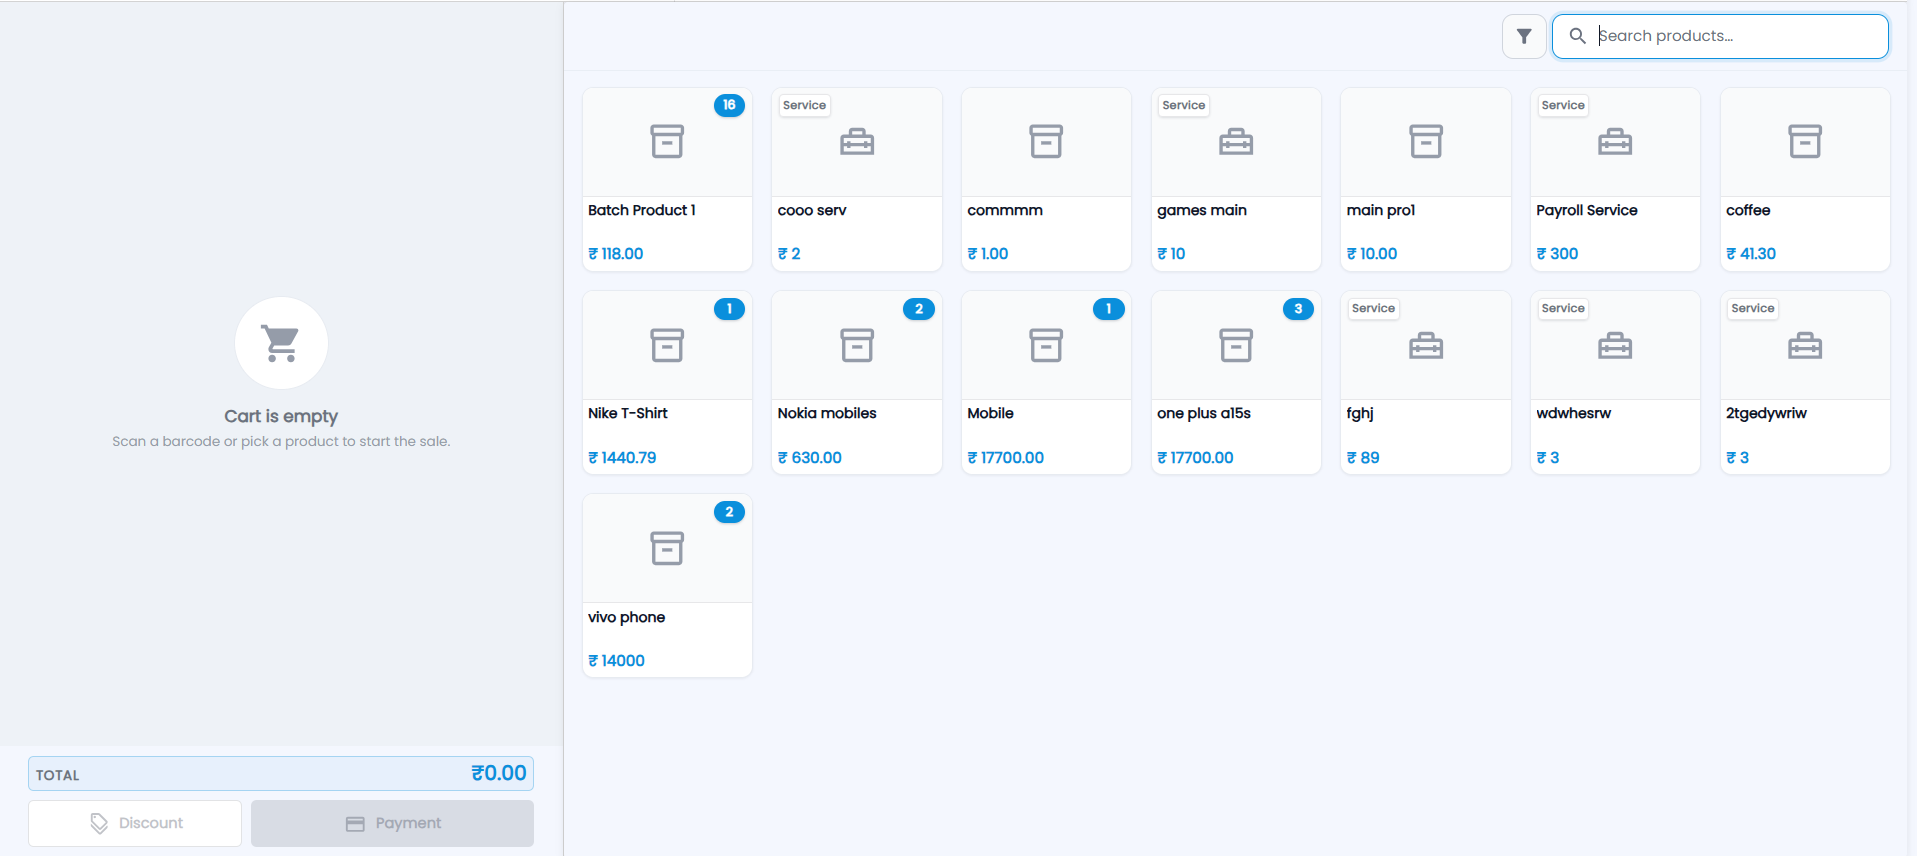
The billing screen has the cart on the left and the product grid on the right. An empty cart says Cart is empty — Scan a barcode or pick a product to start the sale. Each product card shows its name and price; a blue badge shows the stock at the counter’s location, and services are tagged Service. Discount and Payment below the Total stay disabled until the cart has an item.
- Scan or search — type in Search products… or scan a barcode. A scan that matches a single product adds it to the cart straight away. A scan that matches a batch number opens the batch picker.
- Filter — the filter icon narrows the grid by Category and Brand.
- Pick — click a product card to add it. Goods need stock at the counter's location; services and untracked items do not. Batch items open a picker with Batch Number, Expiry Date and Available; serialized items ask for the Serial Number.
Click a line in the cart to open Edit Item, where you change the Quantity, Price or Serial Number, or remove the item. The cart footer shows the number of items, the tax included, any discount and the Sub Total. Below it is the Total.
How do I hold a bill and serve the next customer?
The billing screen has tabs. Click the + (New tab) button to start another bill while the first one stays in its tab; switch back to it any time. The − (Close tab) button removes the current tab. If the counter has pre-orders enabled, you also see PREORDER and the Pre-order list.
The top bar shows Last Synced and a Sync button. Close (click it twice — it turns into Confirm...) takes you back to the Sales Counters page. It does not close the session.
How do I give a discount?
- Click Discount below the total.
- Enter Discount in Percent or Discount in Amount. The maximum allowed is shown in the field.
- Click Apply.
If you are not an Administrator, the payment button changes to Approval Req. Clicking it sends the discount for approval, and a Discount Approval message waits until it is approved. Use Cancel For Request to withdraw it. Requests are handled in Approvals.
How do I take payment?
- Click Payment. The PAYMENT PAGE opens.
- Under CUSTOMER DETAILS, click Pick customer and search for the customer. Their mobile, address and email are shown. You can edit their details or add an email from here.
- Optionally fill Product Info, Reference and Type.
- Check PRODUCT DETAILS: Price, Discount, Coupon Discount, CGST and SGST (or IGST), and Round Off. Edit takes you back to the cart.
- If the customer has a balance, you can tick Use Store Credit Amount or Use Loyalty Points, or Advanced Payment Deduct for an advance.
- Under PAYMENT DETAILS, click a payment mode (the counter's payment methods, for example Cash, Card or UPI) and enter the Tendered amount. The table shows Due, Tendered, Change and Method. You can split the bill across several modes. If your counter counts cash, a denomination sheet asks for the notes received and the change returned.
- Add an Invoice Note or Remarks if needed.
- When the status chip shows Settled, click Validate.
Validate stays disabled until a customer is picked, the cart has items and the payment covers the amount due.
How do I apply a coupon?
On the payment page, the coupon strip says Have a coupon? and how many are available for this bill. Click Apply Coupon, then type the Coupon code or pick one from the list (marked Marketing or Customer). Coupons that do not fit the bill are listed greyed out with the reason. Marketing coupons set to apply automatically are added for you. Applied coupons appear as chips with their value; click × to remove one. The coupon reduces the taxable value, so GST comes down with it. See Coupons.
What happens after I validate?
The sale is saved as an invoice, stock is reduced at the counter's location and the payment is recorded. The receipt screen shows the change to return, with Print Receipt, Print Invoice (the A4 tax invoice) and Next Order, which takes you back to an empty bill. The sale appears in the POS Report and the Invoices list.
How do I close a session?
- On the Sales Counters page, click Close on your counter card.
- The summary opens with three tabs: Payment Summary, Order Summary (customer, invoice, payment mode, products and amount) and CashBox Summary (opening and closing denominations, where used).
- Check the Total. Click Print Summary to preview, print or Download PDF.
- Click Validate to close the session. If there were no sales, enter Remarks first.
View Report in the ⋮ menu lists the counter's sessions with Point Of Sale, Session ID, Responsible, Opening Date, Closing Date and Status. The day's totals across counters are in the Daily Report.