
Overview
Product Master is your list of everything you sell — goods (items you stock) and services. Open Inventory > Product Master. The tabs at the top right take you to each part of it:
| Tab | What it is for |
|---|---|
| Overview | How complete your product data is, and what to fix |
| Products | Your goods and services — view, add, and select them |
| Bulk Edit | Change one field on many products at once |
| Tags | Suggested and existing product tags |
| Variants | Group sizes of the same product into one listing |
| Ecom Integration | Publish ready products to your online shop |
| Import / Export | Upload product pictures, and move products in and out by spreadsheet |
| Settings | What a product needs before it can go online, and defaults for new products |
The Overview Tab
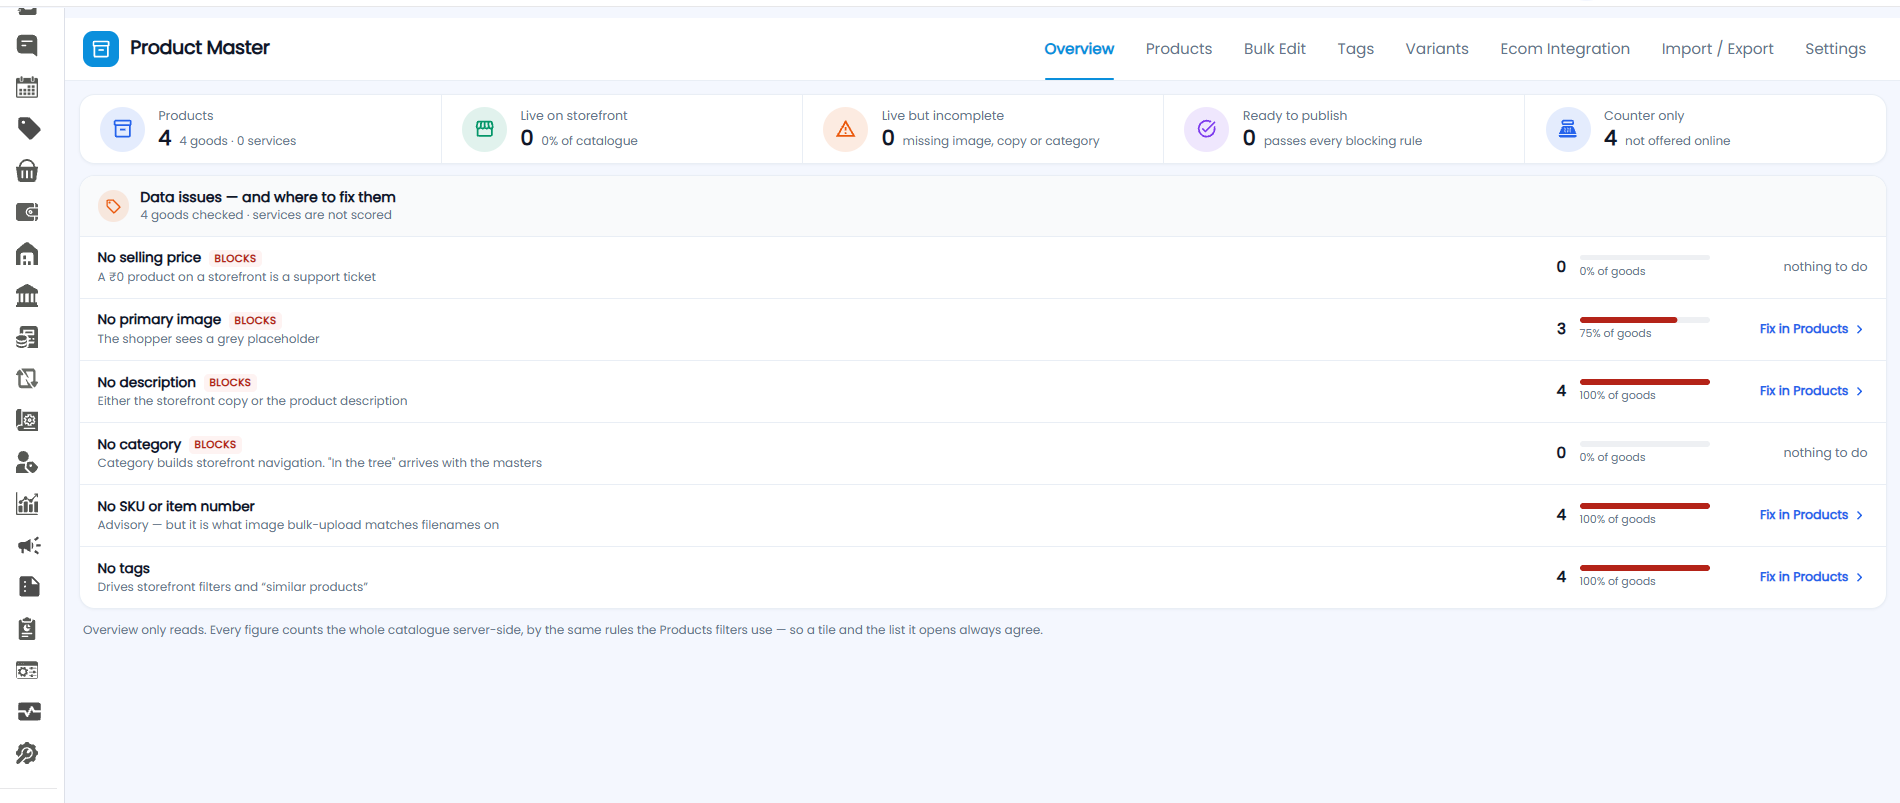
Tiles
| Tile | What it counts |
|---|---|
| Products | All products, split into goods and services |
| Live on storefront | Products shoppers can see online, and what share of the catalogue that is |
| Live but incomplete | Online products missing an image, copy, or category |
| Ready to publish | Products that pass every blocking rule and can go online |
| Counter only | Products sold only at the counter, not offered online |
Data Issues — and Where to Fix Them
This list checks your goods (services are not scored) for missing data. Each line shows how many goods have the problem, what share of goods that is, and a Fix in Products link that opens the Products tab showing just those goods. It says nothing to do when no goods have the problem.
| Issue | Why it matters |
|---|---|
| No selling price BLOCKS | A ₹0 product on a storefront becomes a support ticket |
| No primary image BLOCKS | The shopper sees a grey placeholder |
| No description BLOCKS | Needs either the storefront copy or the product description |
| No category BLOCKS | Category builds the storefront navigation |
| No SKU or item number | Advisory only — but it is what image bulk-upload matches filenames on |
| No tags | Tags drive storefront filters and "similar products" |
Issues marked BLOCKS stop a product being published online. Which issues block is set on the Settings tab.
The Products Tab
The Goods and Services tabs on the left switch between the two lists. Use + to add a product, Search here to find one, the filter icon to narrow the list, the list / grid icons to change the layout, and ⋮ for more actions.
Goods
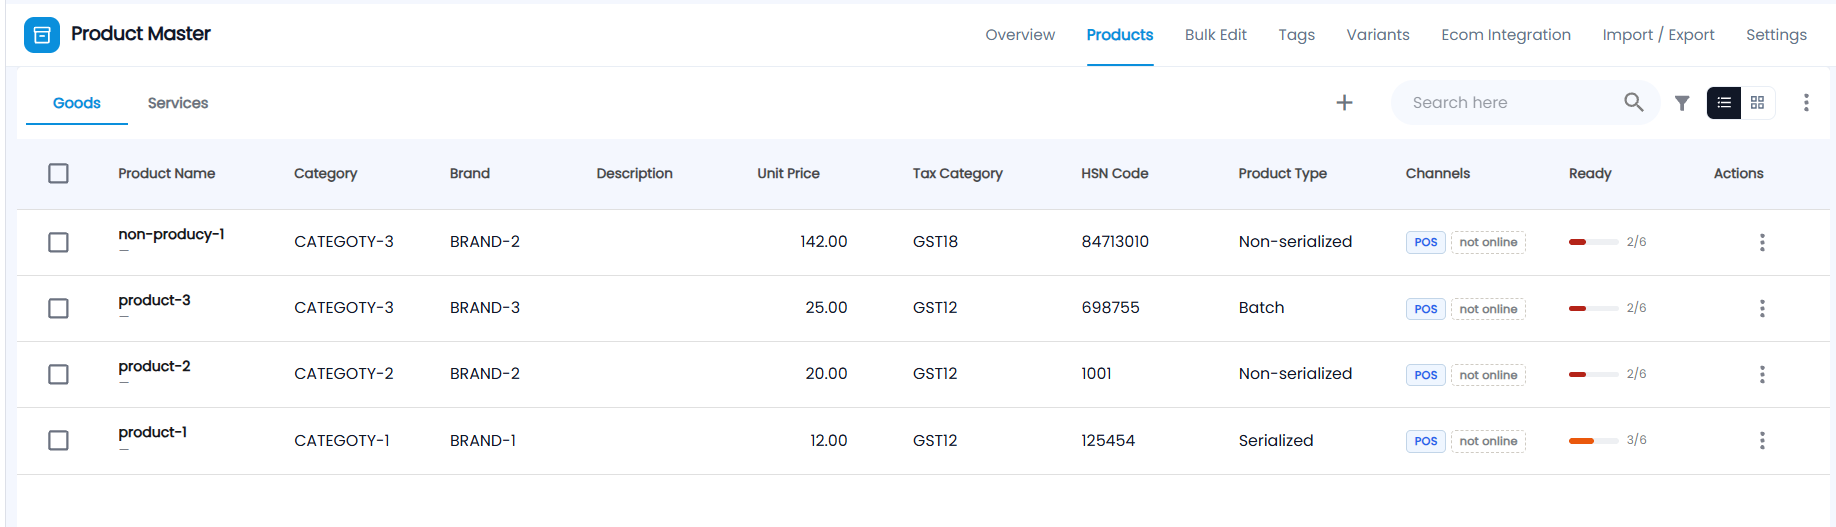
| Column | What it shows |
|---|---|
| Product Name | The product, with its SKU underneath (a dash if it has none) |
| Category / Brand / Description | As entered on the product |
| Unit Price | The selling price |
| Tax Category / HSN Code | The GST category, for example GST12, and the HSN code |
| Product Type | Serialized, Non-serialized, or Batch |
| Channels | Where it sells — POS (the counter), and not online until it is published to your online shop |
| Ready | How many of the six data checks the product passes, for example 2/6, with a bar |
| Actions | ⋮ gives more actions for the product |
Selecting Products
Tick the box next to one or more products (or the box in the heading to tick the whole page). A bar appears at the top:
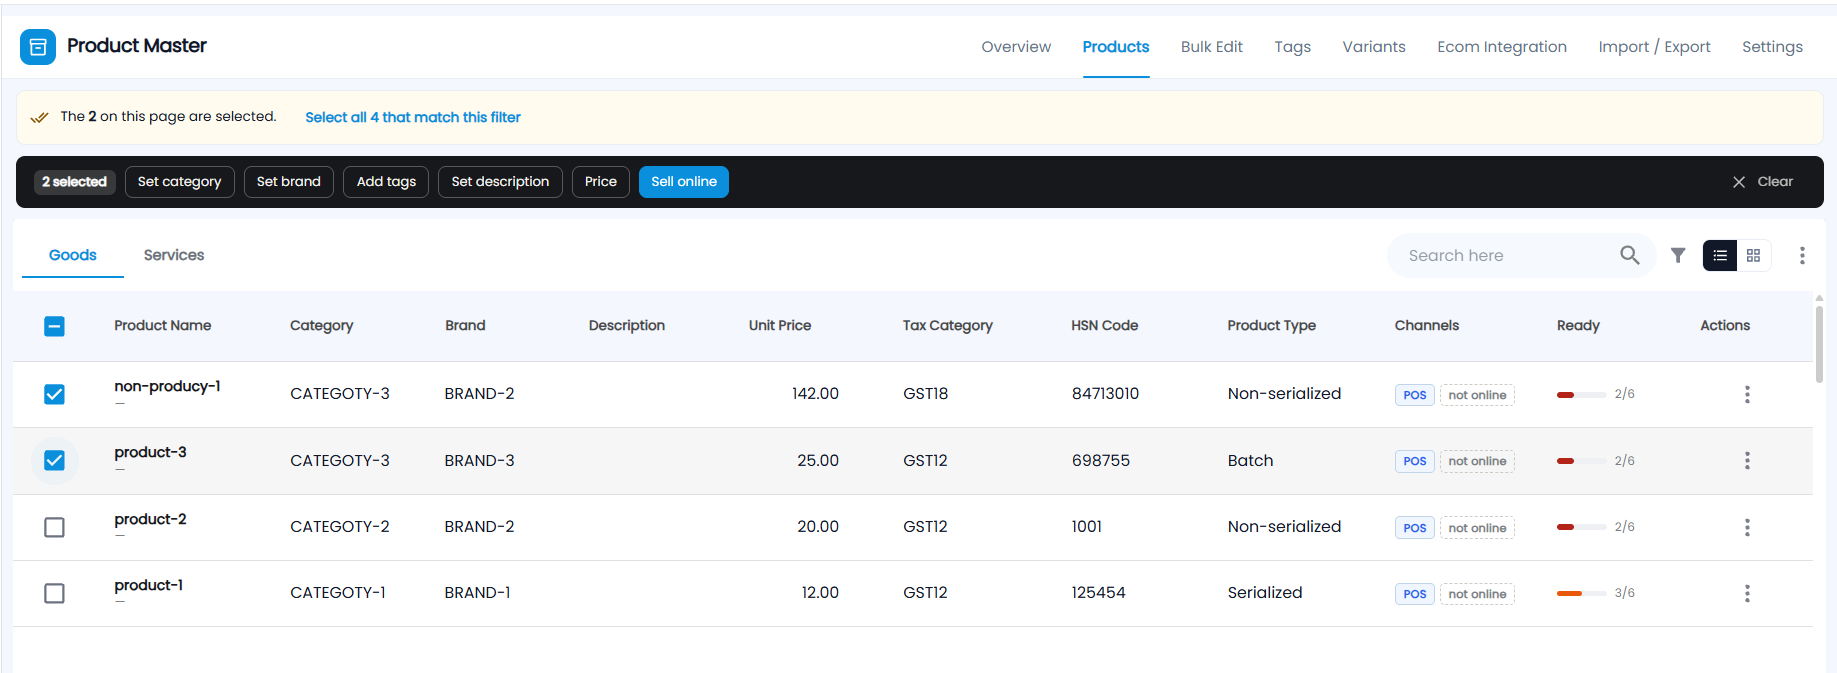
- The notice tells you how many are selected on this page. Click Select all … that match this filter to include every matching product, not just this page.
- The dark bar shows the count (for example 2 selected) and the changes you can make: Set category, Set brand, Add tags, Set description, Price, and Sell online.
- Click a change to open it on the Bulk Edit tab for the selected products.
- Click × Clear to unselect everything.
Adding Goods
On the Goods tab, click +. The New Product form opens with Goods chosen. Fields marked * are required. The Preview panel on the right updates as you type — nothing is saved until you click Submit.
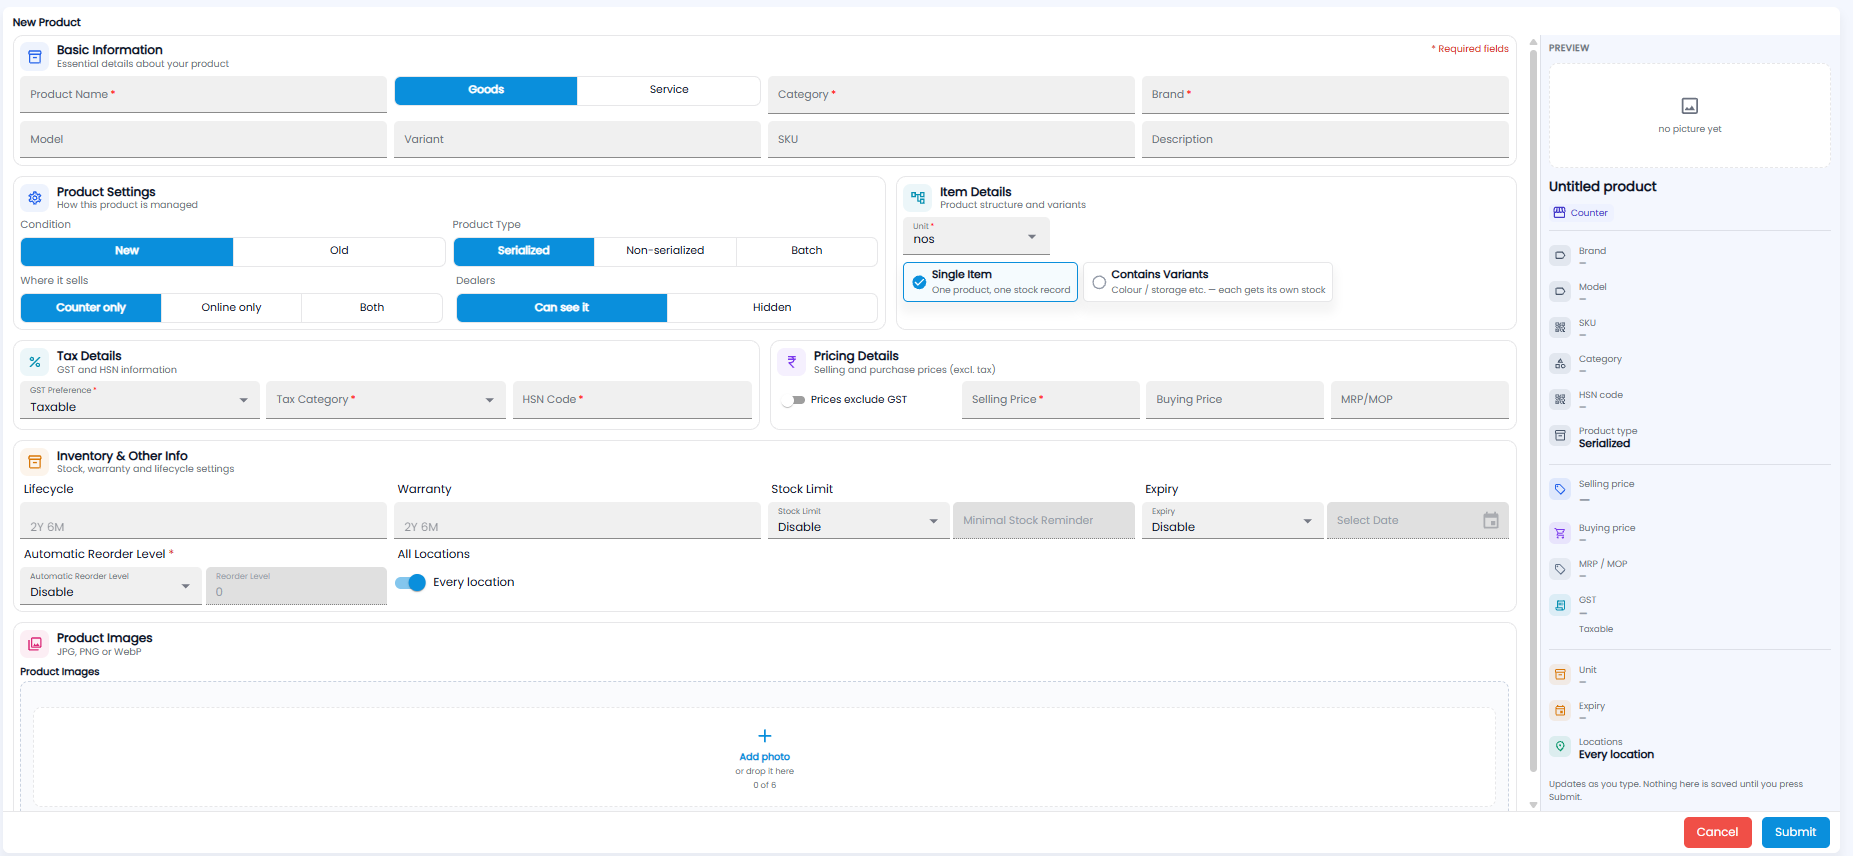
| Section | Fields |
|---|---|
| Basic Information | Product Name*, Category*, Brand*, and Model, Variant, SKU, Description |
| Product Settings | Condition — New or Old. Product Type — Serialized (each unit has a serial number), Non-serialized, or Batch. Where it sells — Counter only, Online only, or Both. Dealers — Can see it or Hidden |
| Item Details | Unit* (for example nos), and Single Item (one product, one stock record) or Contains Variants (colour, storage, etc. — each gets its own stock) |
| Tax Details | GST Preference* (for example Taxable), Tax Category*, HSN Code* |
| Pricing Details | Selling Price*, Buying Price, MRP/MOP. Turn on Prices exclude GST if the prices you enter are before tax |
| Inventory & Other Info | Lifecycle and Warranty (for example 2Y 6M); Stock Limit with a Minimal Stock Reminder; Expiry with a date; Automatic Reorder Level* with a Reorder Level; and All Locations — on to make the product available at every location |
| Product Images | Click Add photo or drop a picture. JPG, PNG, or WebP, up to 6 pictures |
Click Submit to save the product, or Cancel to leave without saving.
Services
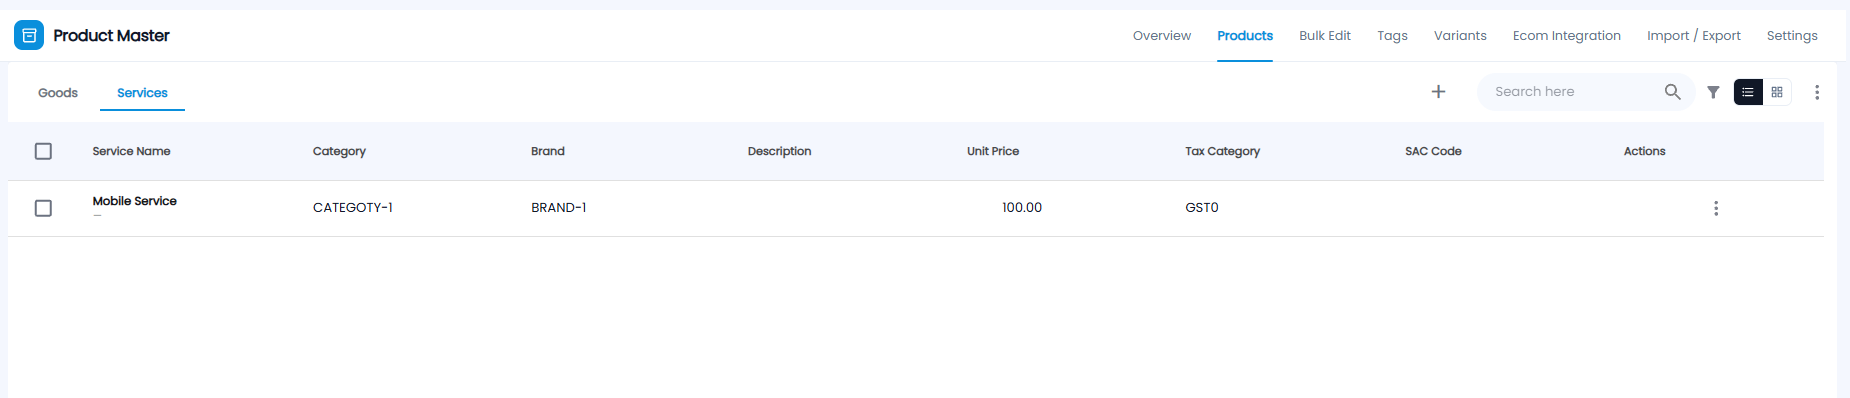
The Services list has the same layout, with Service Name and a SAC Code in place of the HSN code. Services have no product type, channels, or ready score.
Adding a Service
On the Services tab, click +. The same New Product form opens with Service chosen, and only the fields a service needs:
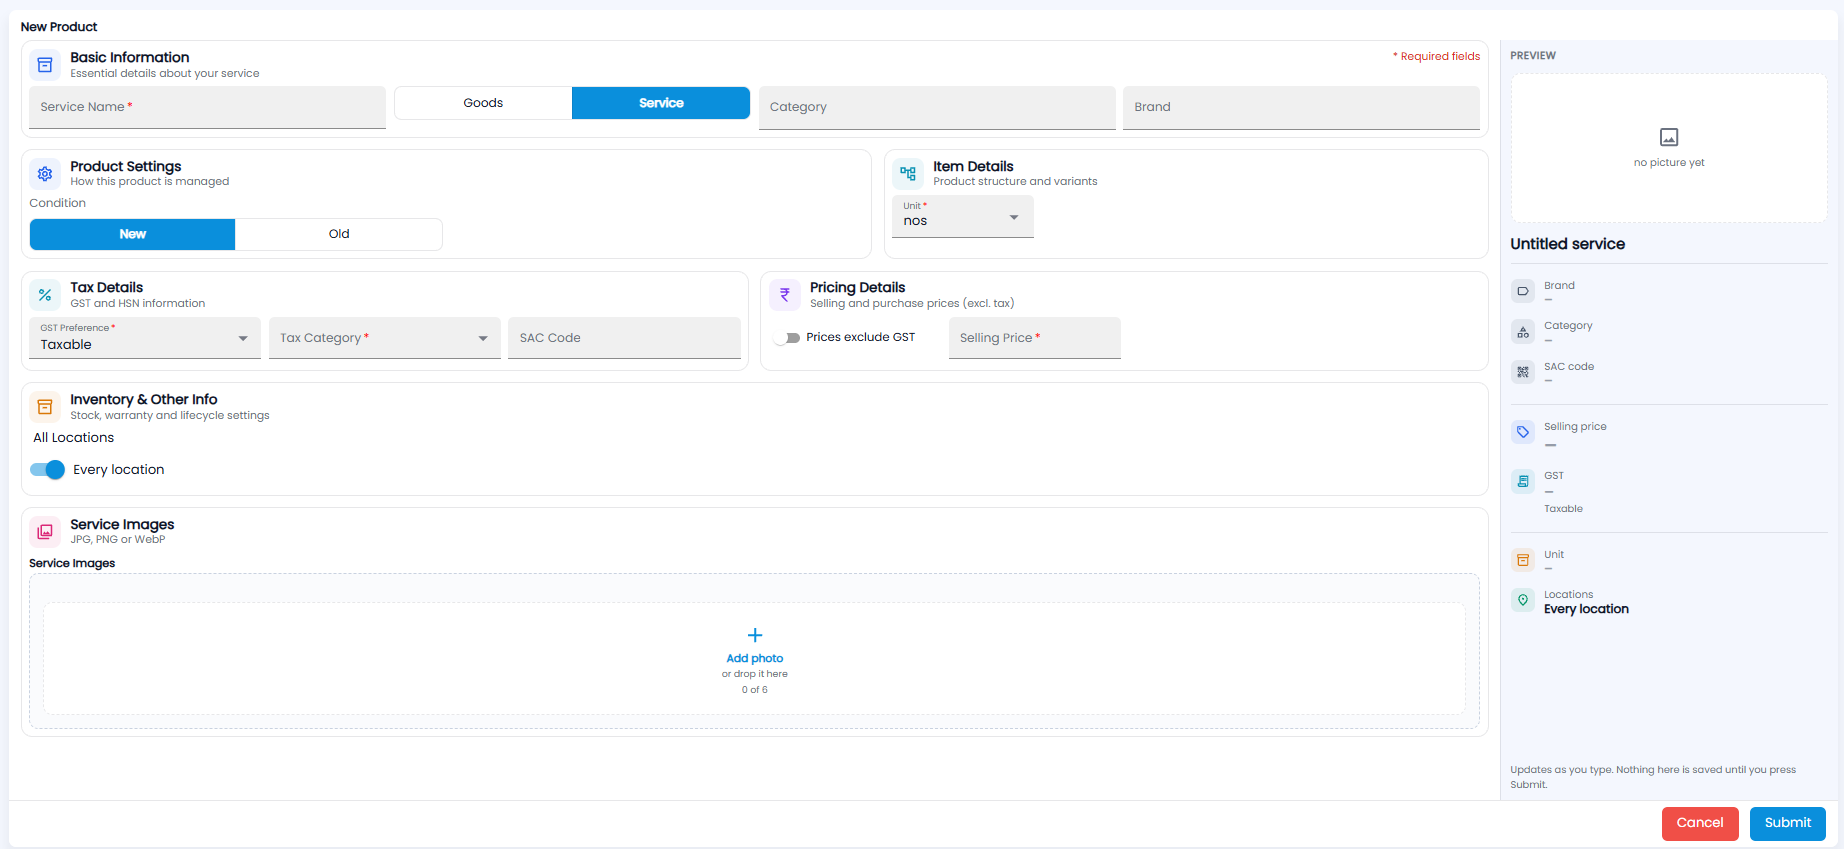
- Basic Information — Service Name*, Category, Brand
- Product Settings — Condition (New or Old)
- Item Details — Unit*
- Tax Details — GST Preference*, Tax Category*, SAC Code
- Pricing Details — Selling Price*, and Prices exclude GST
- Inventory & Other Info — All Locations
- Service Images — JPG, PNG, or WebP
Click Submit, or Cancel.
The Bulk Edit Tab
Bulk Edit changes one field on many products at once. You usually arrive here by selecting products on the Products tab and clicking a change in the bar.
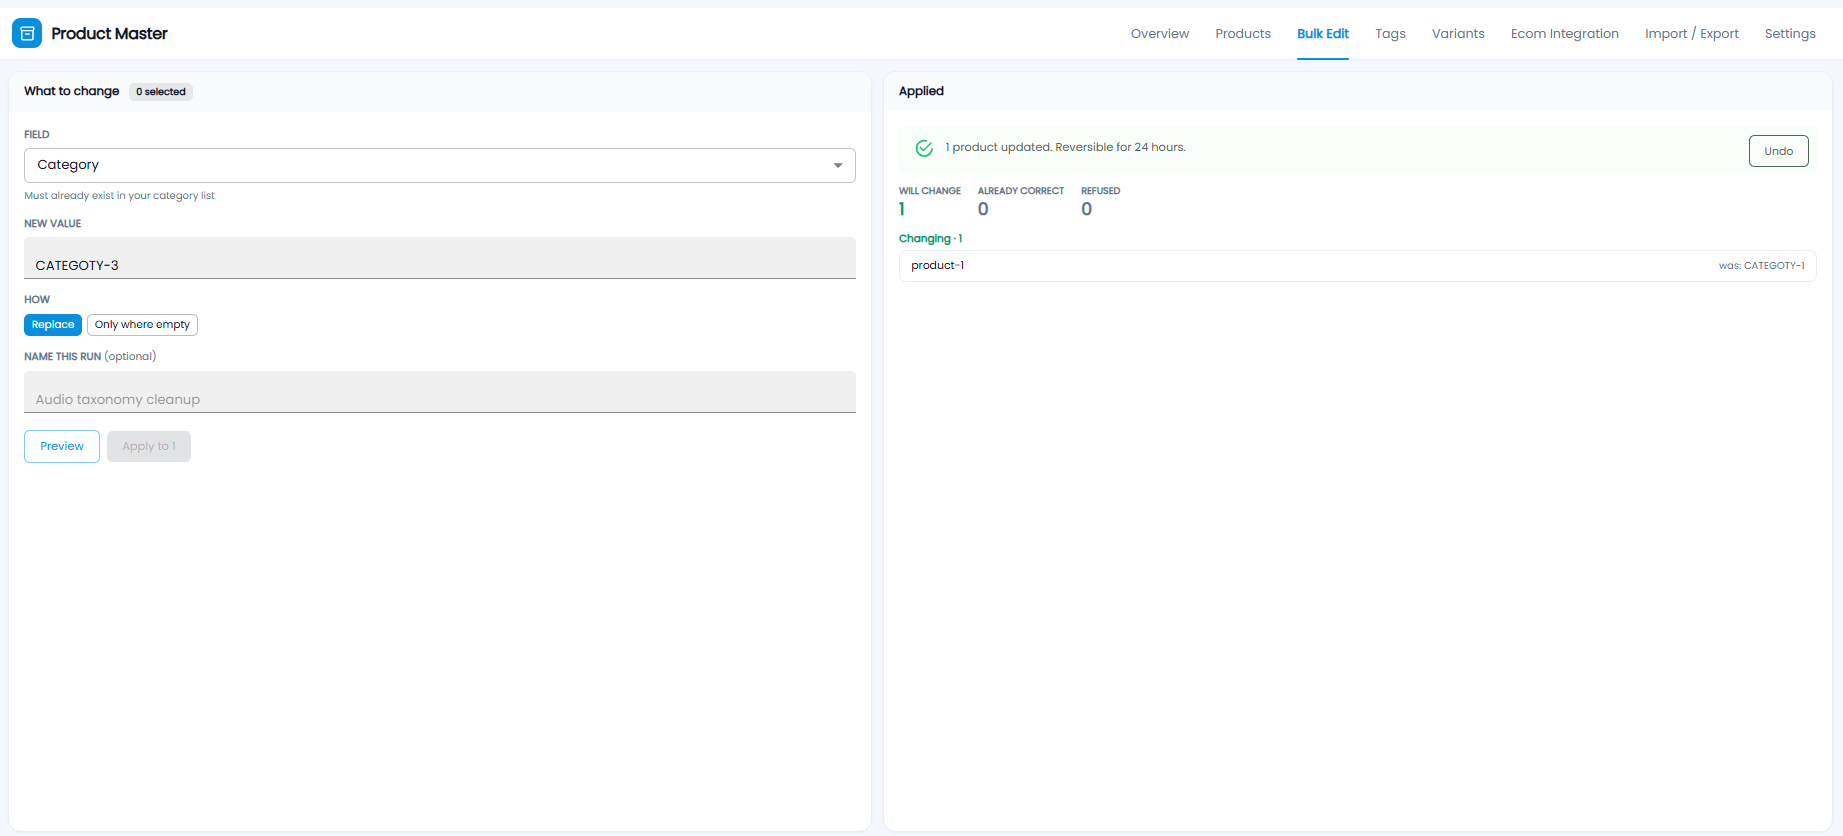
- Under What to change, pick the Field, for example Category. For a category, the value must already exist in your category list
- Enter the New Value
- Choose How: Replace the current value, or Only where empty to fill in products that have no value yet
- Optionally Name this run, so you can recognise it later
- Click Preview. The right side shows how many products Will change, are Already correct, or are Refused, with each product's old value (for example was: CATEGOTY-1)
- Click Apply to … to make the change
Once applied, the right side shows, for example, 1 product updated. Reversible for 24 hours. Click Undo to put the old values back.
The Tags Tab
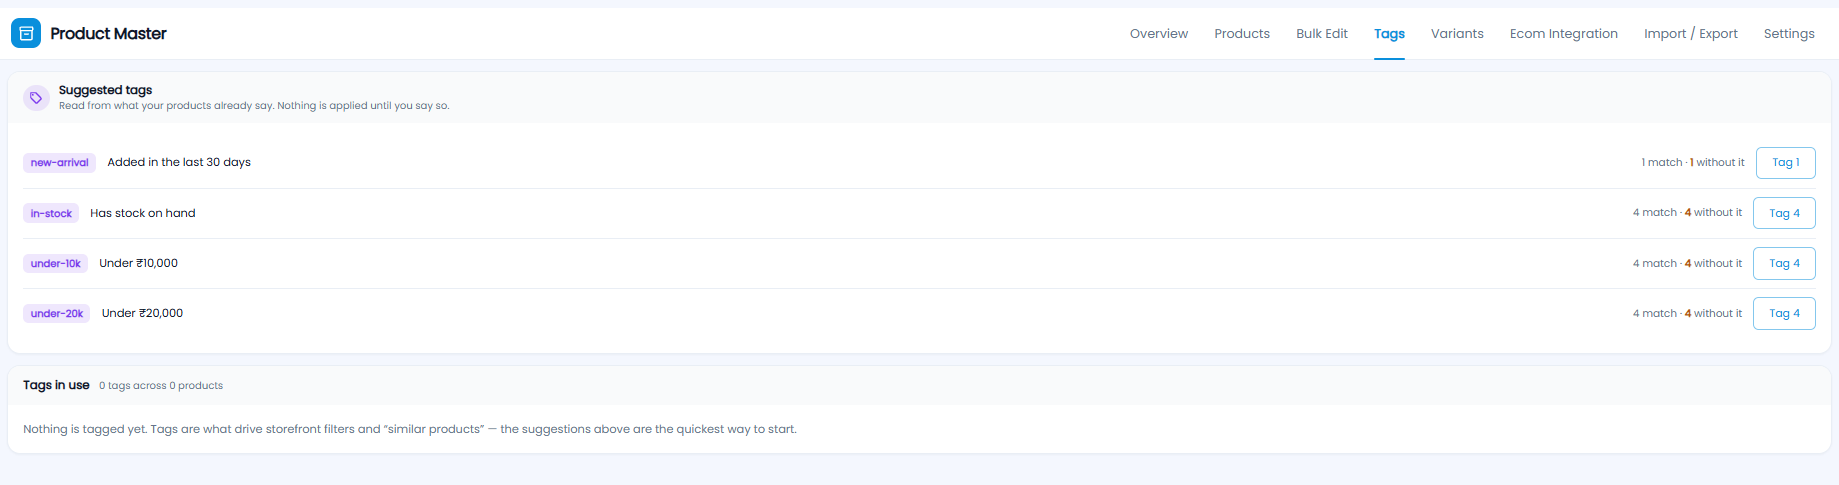
Suggested tags are read from what your products already say. Nothing is applied until you say so. Each suggestion shows its rule — for example new-arrival (added in the last 30 days), in-stock (has stock on hand), under-10k (under ₹10,000) — with how many products match and how many of those do not have the tag yet. Click Tag … to add the tag to them.
Tags in use lists the tags already on your products. Tags drive storefront filters and "similar products".
The Variants Tab
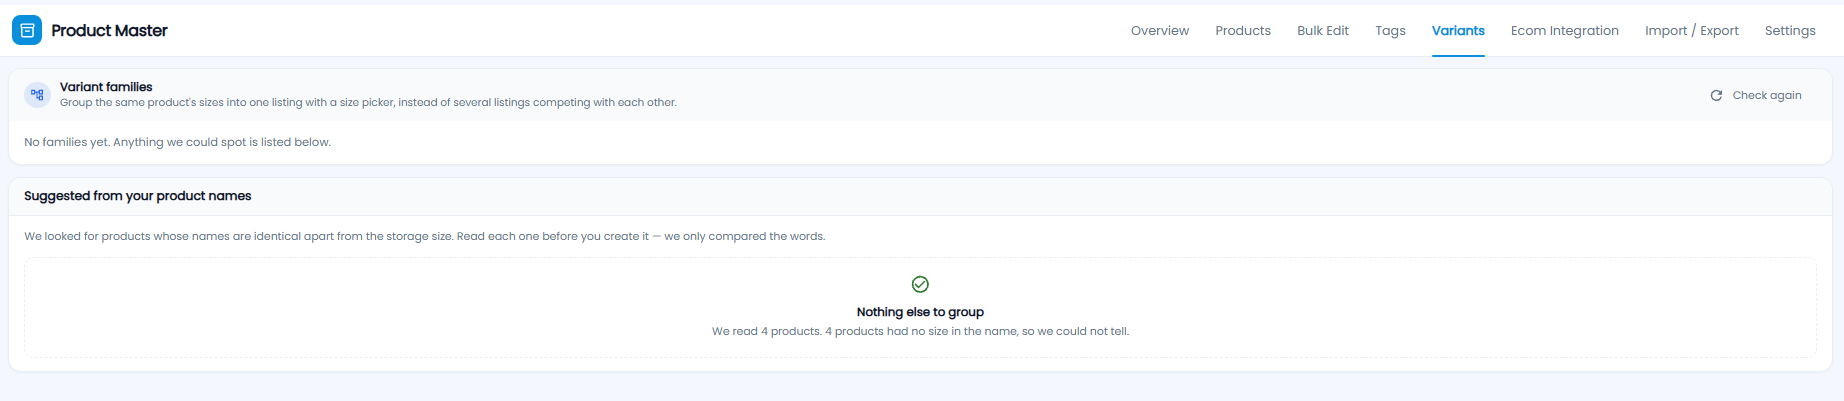
Variant families group sizes of the same product into one listing with a size picker, instead of several listings competing with each other.
Suggested from your product names lists products whose names are identical apart from the storage size. Read each one before you create it — only the words are compared. If there is nothing to group, it says so, and how many products had no size in the name. Click Check again after adding or renaming products.
The Ecom Integration Tab
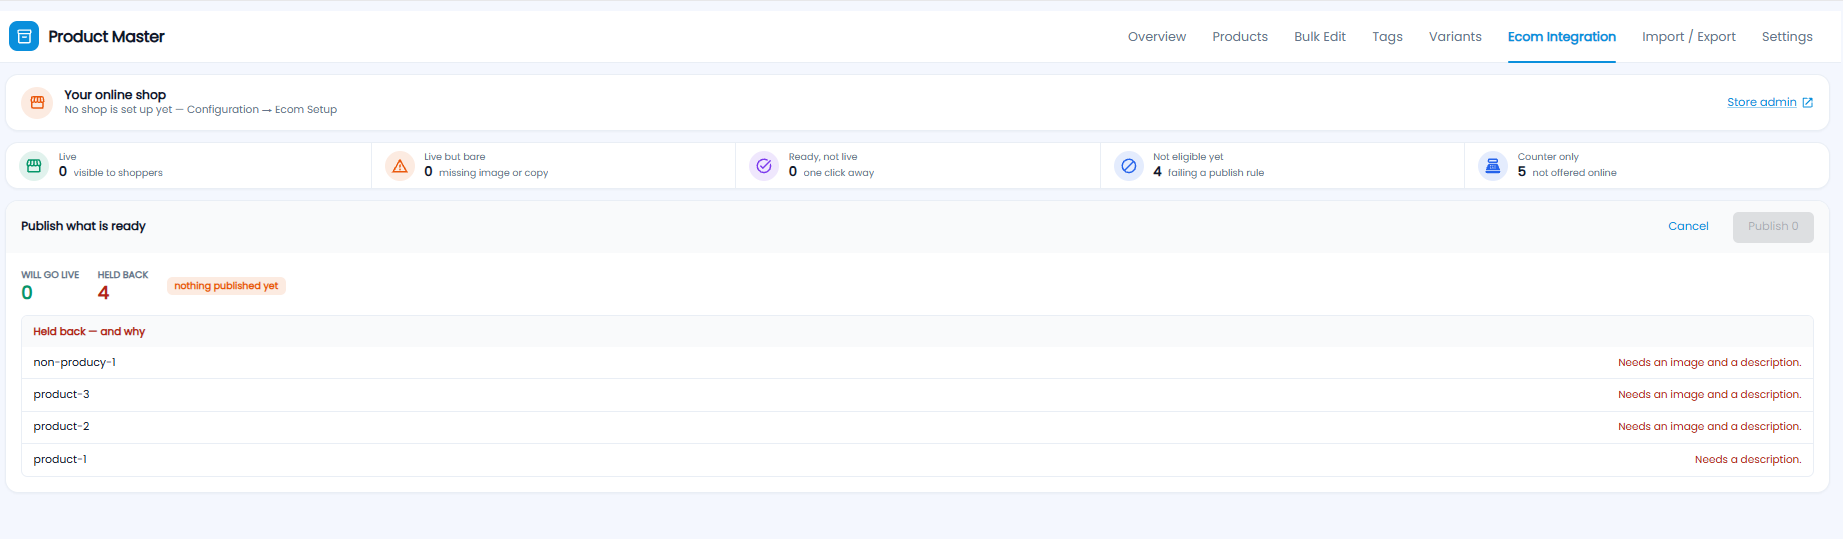
Your online shop shows whether a shop is set up. If not, set it up in Configuration → Ecom Setup. Store admin opens your shop's admin.
| Tile | What it counts |
|---|---|
| Live | Products visible to shoppers |
| Live but bare | Online products missing an image or copy |
| Ready, not live | One click away from going online |
| Not eligible yet | Failing a publish rule |
| Counter only | Not offered online |
Publish what is ready shows how many products Will go live and how many are Held back. Held back — and why lists each held-back product with what it still needs, for example Needs an image and a description. Click Publish … to put the ready products online, or Cancel.
The Import / Export Tab
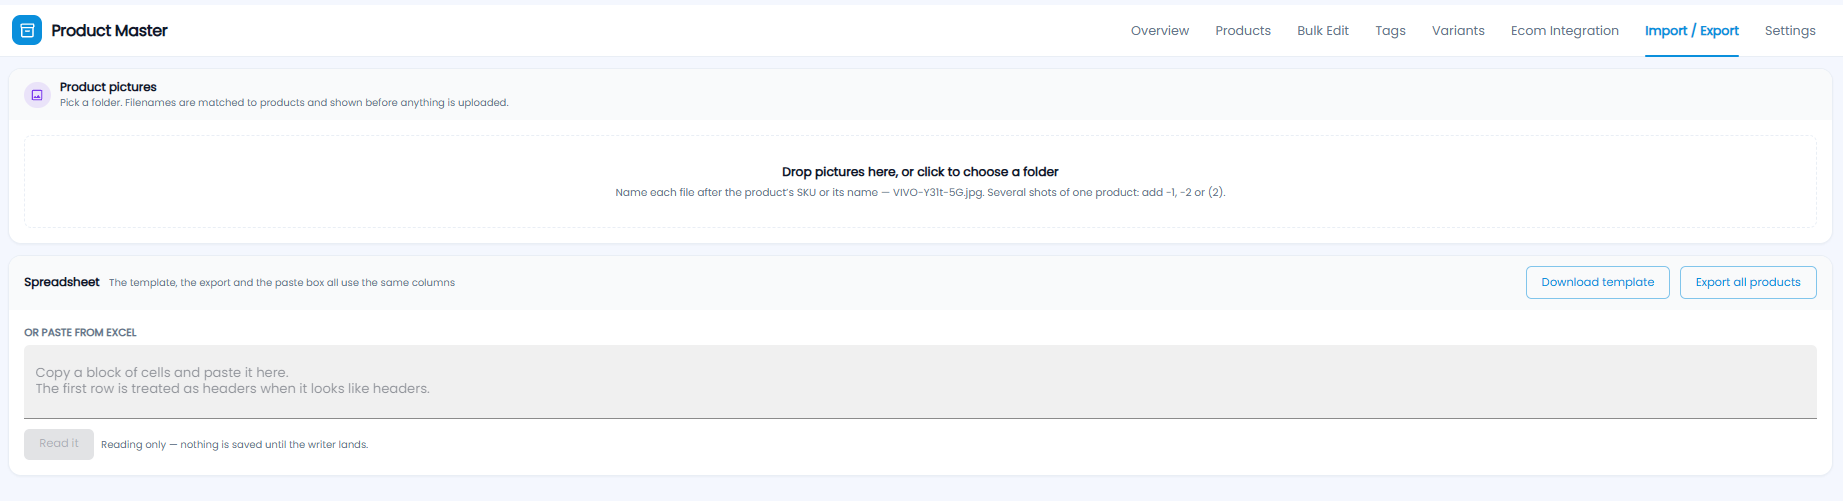
Product Pictures
Drop pictures on the box, or click it to choose a folder. Name each file after the product's SKU or its name — for example VIVO-Y31t-5G.jpg. For several pictures of one product, add -1, -2, or (2). Filenames are matched to products and shown to you before anything is uploaded.
Spreadsheet
- Download template — a blank spreadsheet with the right columns
- Export all products — all your products in the same columns
- Or paste from Excel — copy a block of cells and paste it into the box. The first row is treated as headings when it looks like headings. Click Read it to check what was pasted
The Settings Tab
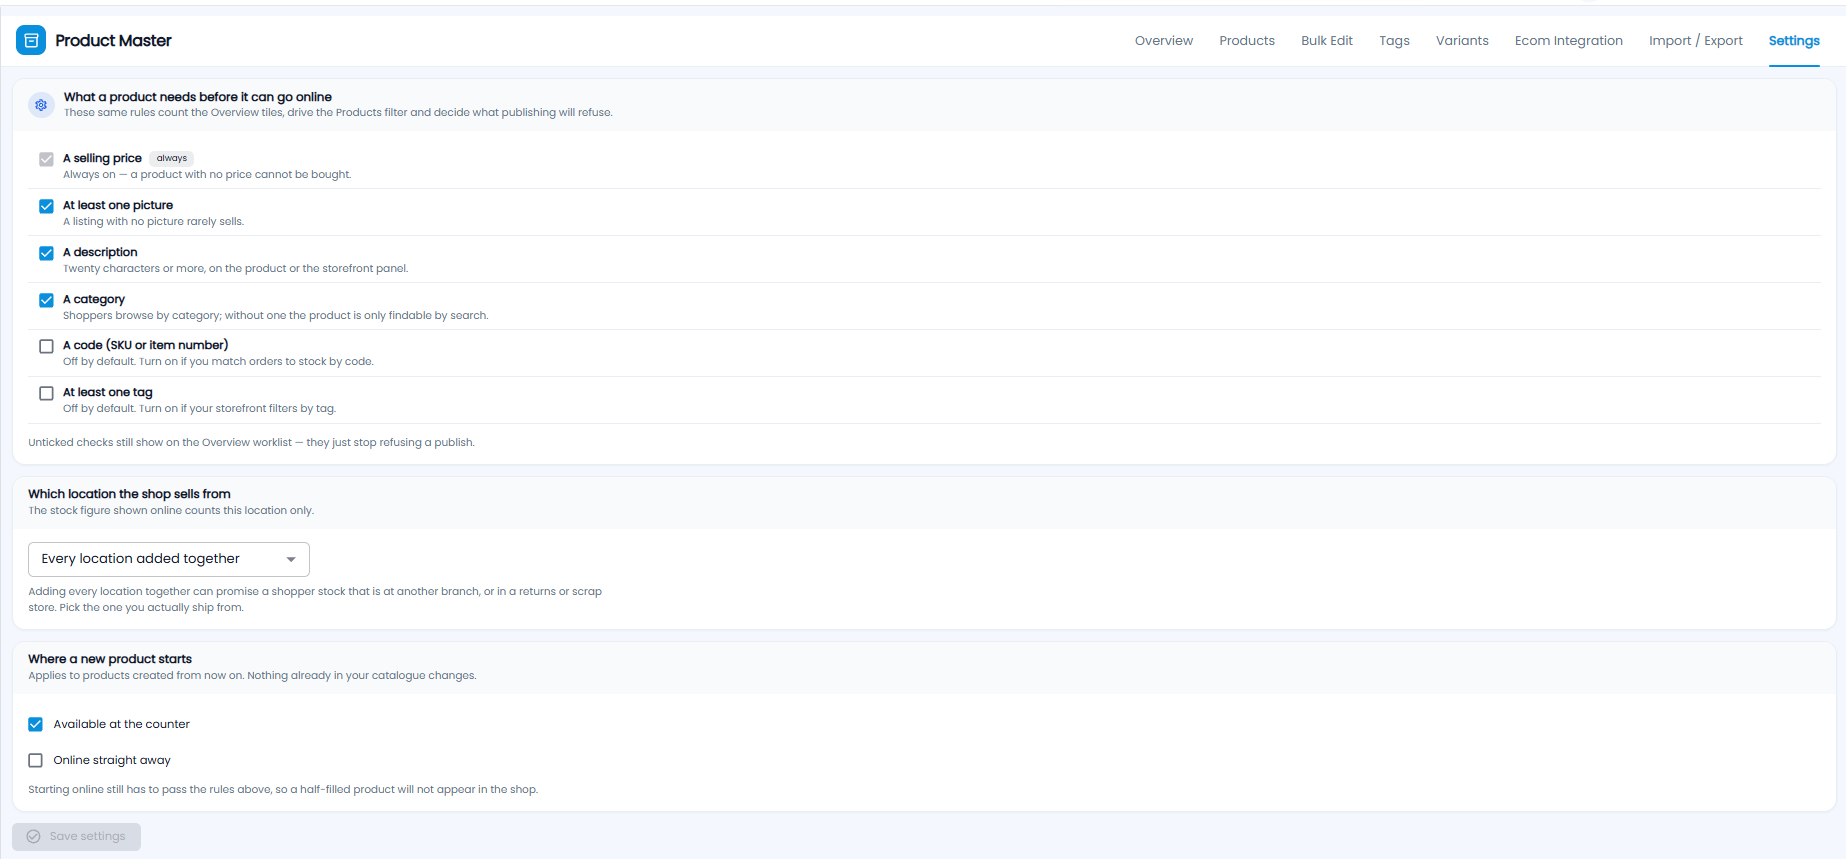
What a Product Needs Before It Can Go Online
These rules count the Overview tiles, drive the Products filter, and decide what publishing refuses. Tick the ones that must pass:
| Check | Default |
|---|---|
| A selling price | Always on — a product with no price cannot be bought |
| At least one picture | On |
| A description | On — twenty characters or more, on the product or the storefront panel |
| A category | On — without one, the product can only be found by search |
| A code (SKU or item number) | Off — turn on if you match orders to stock by code |
| At least one tag | Off — turn on if your storefront filters by tag |
Unticked checks still show on the Overview list — they just stop refusing a publish.
Which Location the Shop Sells From
The stock shown online counts this location only. Every location added together can promise a shopper stock that is at another branch, or in a returns or scrap store — pick the location you actually ship from.
Where a New Product Starts
Tick Available at the counter and / or Online straight away. This applies only to products created from now on. A product set to go online straight away still has to pass the rules above, so a half-filled product does not appear in the shop.
Click Save settings to keep your changes.