
How do I add a new employee in Tazk Payroll?
Open Contacts and click + Create Contact. The New Employee form has four steps: Personal Info (name, gender, phone, date of birth, work email, address), Application Info (role, user name, password, locations and attendance methods), Payroll Info (employee code, department, designation, category, joining date, shift and payment method) and Statutory & Salary (PF, ESI, PT and the salary template). Click Continue after each step and Submit at the end.
Overview
Click + Create Contact on the Contacts page. The New Employee form ("Create a profile and add employment details") opens with four steps: Personal Info, Application Info, Payroll Info and Statutory & Salary. Fields marked * are required. Click Continue to move on, Back to return, or click any step at the top to jump to it.
Step 1: Personal Info

Basic information
| Field | Required | Description |
|---|---|---|
| First Name | Yes | Employee's first name |
| Last Name | No | Employee's last name |
| Gender | Yes | Select from the list |
| Phone Number | Yes | 10-digit mobile number; it must not belong to another employee |
| Office Phone Number | No | Secondary number (10–12 digits) |
| Date of Birth | Yes | The employee must be at least 18 |
| Work Email | Yes | Must not belong to another employee |
Contact information
Address, Area, Pincode, City, State, Country (default: India), Latitude and Longitude. Entering a 6-digit pincode fills in the city and state.
Step 2: Application Info

Account & access
| Field | Required | Description |
|---|---|---|
| User Role | Yes | Employee, Manager, HR Manager, etc. |
| User Name | Yes | Login name after your company prefix — the form shows the full user name, for example abc.john.doe |
| Password | Yes | At least 8 characters, with an uppercase letter, a lowercase letter, a number and a special character (#?!@$%^&*-) |
| Location | Yes | One or more work locations |
| Primary Location | Yes | The main location, chosen from those above |
Attendance permissions
Switch on the ways this employee may mark attendance:
| Switch | What it allows |
|---|---|
| Restrict Location for Attendance | Attendance only from the employee's locations. Greyed out until GPS attendance is enabled for the company. |
| Enable Live Location | Tracks the employee's position during work hours (Live Location). |
| Work From Home | Attendance from a work-from-home location. |
| Selfie Attendance | A selfie is taken when marking attendance. |
| Web Attendance | Clock in / out and take breaks from the web dashboard. |
| App Access | The employee can sign in to the Tazk app. On by default. |
| Manual Attendance | Attendance can be marked manually for them. On by default. |
| Attendance Via App | Attendance from the mobile app. On by default. |
| Device Attendance | Attendance from a registered biometric device. |
A switch stays greyed out until that method is enabled for the company in Configuration. Face Attendance also appears on plans that include it.
Step 3: Payroll Info

Employment details
| Field | Required | Description |
|---|---|---|
| Employee Code | Yes | Unique code, up to 15 letters, numbers or hyphens. A company prefix may be filled in for you. |
| Department | Usually | Select, or + to add a new department |
| Designation | Yes | Select or type, or + to add a new one |
| Employee Category | Yes | For example Confirmed, Probationers, Interns; + adds a new one |
| Reporting Manager | No | The employee's manager |
| Date Of Joining | Yes | Official joining date |
If the category has a probation period, a box shows it ("This category carries a N month(s) probation period") with Probation runs from (the joining date) and Probation end date.
Working Shift
"Optionally pick or create a shift for this employee. Leave it empty to skip." Choose a Shift (or + to create one). Once a shift is chosen, schedule it Month Wise or Date Wise, and choose Monthly or Auto Renew, which generates the schedule again every month.
Payment method
Choose the Mode of Payment — Cash or Bank. For Bank, choose the transaction type and fill in the bank account details: Bank Name, Beneficiary A/c No., IFSC Code, Employee Name in Bank, Bank Branch, Bank Address, Beneficiary Code and PAN Number.
Step 4: Statutory & Salary
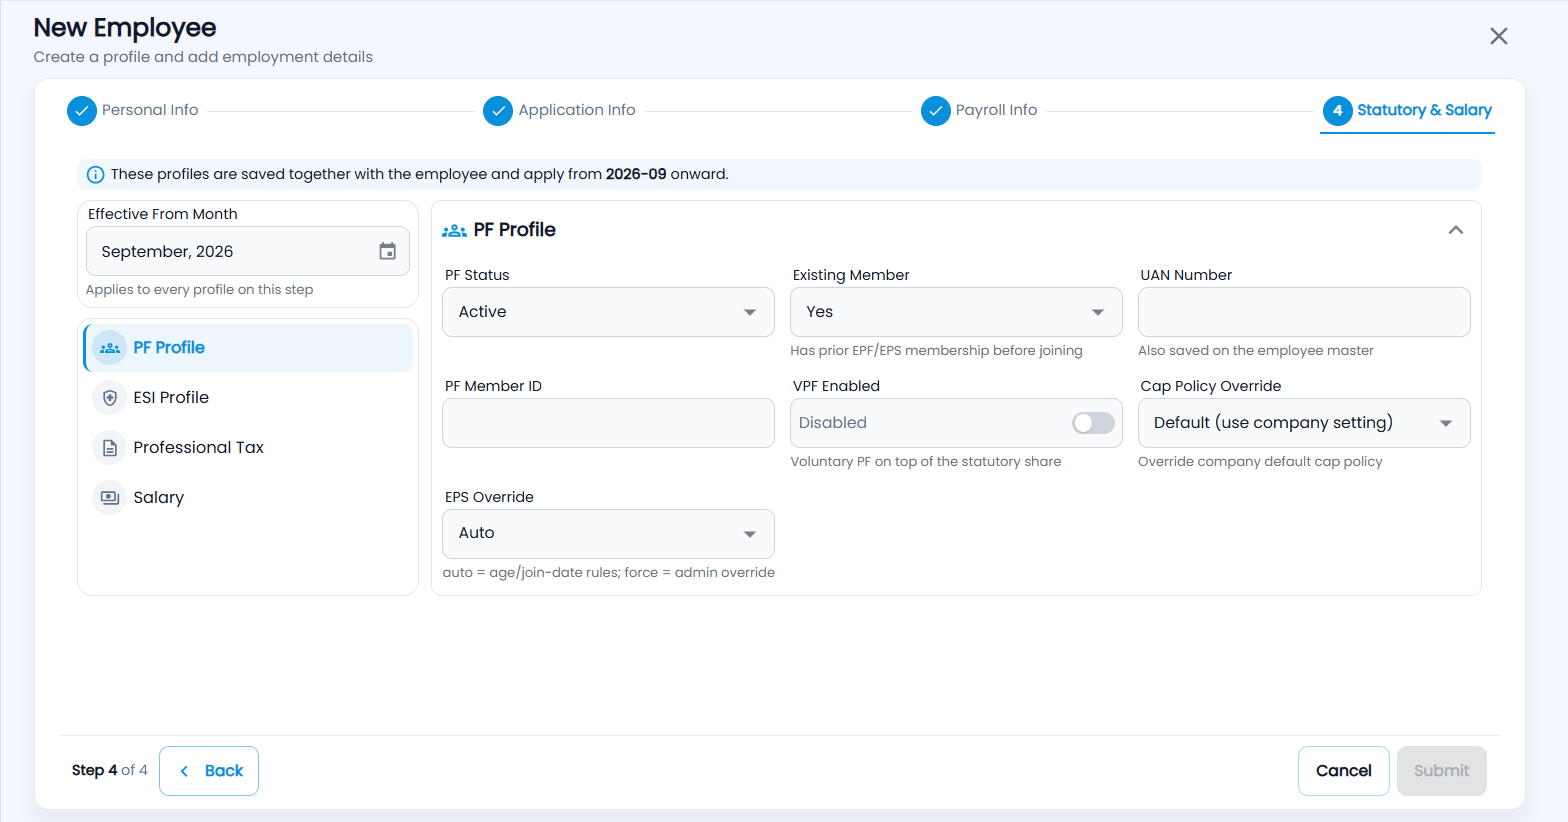
Nothing on this step is required. "These profiles are saved together with the employee and apply from" the Effective From Month on the left, which applies to every profile on this step. Pick a section from the list — PF Profile, ESI Profile, Professional Tax, Salary. (If PF, ESI and PT are all switched off for your company, the step is just called Salary.)
- PF Profile:
- PF Status — Active or Excluded.
- Existing Member — whether they had EPF/EPS membership before joining.
- UAN Number (also saved on the employee record) and PF Member ID.
- VPF Enabled — voluntary PF on top of the statutory share, as a percent or a fixed amount.
- Cap Policy Override — Default (use company setting), or override the company's PF wage cap.
- EPS Override — Auto follows the age and joining-date rules; Force Yes / Force No is an admin override.
- ESI Profile — ESI Status (Active / Not Covered), IP Number, and person-with-disability details.
- Professional Tax — PT Applicable or exempt (with a reason), and the state if it differs.
- Salary — pick the Salary Template (or + to create one), enter the Gross Salary per month and the effective date (defaults to the joining date). The components table shows each component with gross, monthly CTC and net pay.
Click Submit. You see "Created Successfully" and the employee appears in the directory, with their salary, shift and statutory profiles saved.