
Overview
The Integrations page sends asset bills and depreciation into your accounting software, so you do not have to type them twice. Click Integrations in the sidebar to open it.
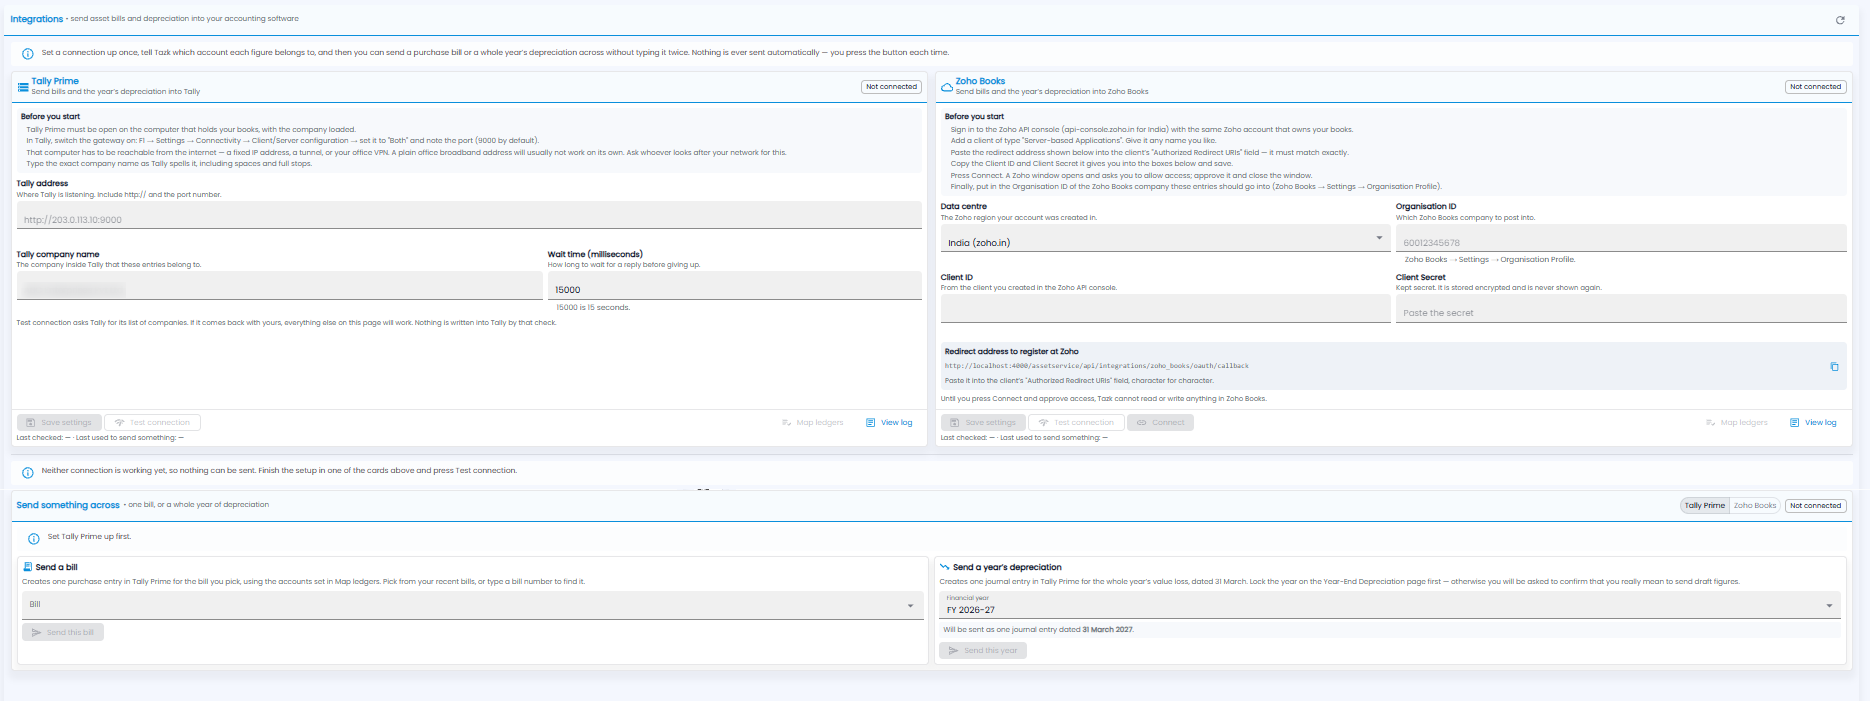
It works in three steps:
- Set up a connection once — to Tally Prime or Zoho Books
- Map ledgers — tell Tazk which account in your books each figure belongs to
- Send a purchase bill, or a whole year's depreciation
Each connection card shows its status at the top right, for example Not connected, and at the bottom Last checked and Last used to send something.
Connecting Tally Prime
Before You Start
- Tally Prime must be open on the computer that holds your books, with the company loaded.
- In Tally, switch the gateway on: F1 → Settings → Connectivity → Client/Server configuration, set it to Both, and note the port (9000 by default).
- That computer must be reachable from the internet — through a fixed IP address, a tunnel, or your office VPN. A plain office broadband connection usually will not work on its own. Ask whoever looks after your network.
- Type the company name exactly as Tally spells it, including spaces and full stops.
Tally Fields
| Field | Description |
|---|---|
| Tally address | Where Tally is listening, including http:// and the port number, for example http://203.0.113.10:9000 |
| Tally company name | The company inside Tally that these entries belong to, for example ABC Enterprises Pvt Ltd |
| Wait time (milliseconds) | How long to wait for Tally to reply before giving up. 15000 is 15 seconds |
Setting It Up
- Fill in the three fields
- Click Save settings
- Click Test connection. This asks Tally for its list of companies. If yours comes back, everything else on the page will work. Nothing is written into Tally by this check
- Click Map ledgers and choose the Tally ledger for each figure
Click View log to see what has been sent to Tally.
Connecting Zoho Books
Before You Start
- Sign in to the Zoho API console (api-console.zoho.in for India) with the same Zoho account that owns your books
- Add a client of type Server-based Applications. Give it any name you like
- Paste the Redirect address shown on the card into the client's Authorized Redirect URIs field. It must match exactly — use the copy icon next to it
- Copy the Client ID and Client Secret Zoho gives you into the boxes on the card, and save
- Press Connect. A Zoho window opens and asks you to allow access — approve it and close the window
- Finally, enter the Organisation ID of the Zoho Books company the entries should go into
Zoho Books Fields
| Field | Description |
|---|---|
| Data centre | The Zoho region your account was created in, for example India (zoho.in) |
| Organisation ID | Which Zoho Books company to post into. Find it in Zoho Books → Settings → Organisation Profile |
| Client ID | From the client you created in the Zoho API console |
| Client Secret | From the same client. It is stored encrypted and never shown again |
| Redirect address to register at Zoho | The address to paste into the Zoho client, character for character |
The card's buttons work as for Tally: Save settings, Test connection, Connect, Map ledgers, and View log.
Sending Something Across
The Send something across section sends one bill, or a whole year of depreciation. Use the Tally Prime / Zoho Books switch at the top right to choose where it goes.
Send a Bill
Creates one purchase entry for the bill you pick, using the accounts set in Map ledgers.
- In Bill, pick one of your recent bills, or type a bill number to find it
- Click Send this bill
Send a Year's Depreciation
Creates one journal entry for the whole year's loss in value, dated 31 March of that year.
- Choose the Financial year, for example FY 2026-27. The line below confirms the date, for example 31 March 2027
- Click Send this year